
| 일 | 월 | 화 | 수 | 목 | 금 | 토 |
|---|---|---|---|---|---|---|
| 1 | 2 | 3 | 4 | 5 | ||
| 6 | 7 | 8 | 9 | 10 | 11 | 12 |
| 13 | 14 | 15 | 16 | 17 | 18 | 19 |
| 20 | 21 | 22 | 23 | 24 | 25 | 26 |
| 27 | 28 | 29 | 30 |
- 유튜브
- Python
- android exoplayer
- android
- doc2vec
- 스피너
- 안드로이드
- kotlin list
- video caching
- AWS EC2
- ktor api call
- DiffUtil.ItemCallback
- ListAdapter DiffUtil
- android ktor
- list map
- build with ai
- exoplayer cache
- llm
- FastAPI
- map
- kotlin collection
- Zsh
- ChatGPT
- 유튜브 요약
- android custom view
- 시행착오
- ListAdapter
- getChangePayload
- ExoPlayer
- ktor client
- Today
- Total
버튼 수집상
[안드로이드] 그림자에 색깔 있는 카드뷰 만들기-1 Custom CardView with shadowColor attribute 본문
[안드로이드] 그림자에 색깔 있는 카드뷰 만들기-1 Custom CardView with shadowColor attribute
cocokaribou 2023. 8. 1. 17:49배경
카드뷰 그림자에 색이 들어가게 해달라는 요청이 있었다.
기존에 outlineSpotShadowColor 라는 옵션이 있으나 API 28부터만 지원했다.
그래서 카드뷰를 직접 구현해보기로 했다.
요구사항
1. 카드뷰처럼 elevation, radius 값 지정이 돼야 한다.
2. 그림자 색 지정이 돼야 한다.
요구사항을 충족시키려면 onDraw()로 구현할 수 밖에 없어보였다.
attrs.xml (~/res/values)
<?xml version="1.0" encoding="utf-8"?>
<resources>
    <declare-styleable name="CustomCardView">
        <attr name="c_elevation" format="dimension" />
        <attr name="c_shadowColor" format="reference|color" />
        <attr name="c_cardBackground" format="reference|color" />
        <attr name="c_radius" format="dimension" />
    </declare-styleable>
</resources>
attrs를 선언하면 xml 코드의 app namespace에서 값을 설정할 수 있다.
format을 모르겠을 땐, xml에서 다른 어트리뷰트를 cmd + 클릭해서 확인해보면 된다.
시도1
CustomCardView.kt (커스텀 카드뷰의 루트)
class CustomCardView @JvmOverloads constructor(
    context: Context,
    attrs: AttributeSet? = null,
    defStyleAttr: Int = 0
) : FrameLayout(context, attrs, defStyleAttr) {

    init {
        setBackgroundColor(Color.parseColor("#00000000"))
        attrs?.let {
            // attrs 값 가져오기
            val typedArray = context.obtainStyledAttributes(it, R.styleable.CustomCardView)

            val mRadius = typedArray.getDimension(R.styleable.CustomCardView_c_radius, 0f)
            val elevation = typedArray.getDimension(R.styleable.CustomCardView_c_elevation, 0f)
            val shadowColor = typedArray.getColor(R.styleable.CustomCardView_c_shadowColor, 0)
            val backgroundColor = typedArray.getColor(R.styleable.CustomCardView_c_cardBackground, 0)

            /**
             * 그림자
             * elevation 단계만큼 alpha 값을 조정한 그림자를 더한다.
             */
            (0..elevation.toInt()).forEach { depth ->
                val percentage = depth.toFloat() / elevation

                // 투명도에 0.125를 곱해서 그림자 색으로 지정한 원색보다 옅게 만든다.
                val mAlpha = 256 * percentage * 0.125

                // RoundSquare 커스텀뷰 add
                val shadow =
                    RoundSquare(mRadius, shadowColor, mAlpha.toInt(), context).apply {
                        layoutParams = LayoutParams(MATCH_PARENT, MATCH_PARENT).apply {
                            marginStart = depth * 4
                            marginEnd = depth * 4
                            topMargin = depth * 4
                            bottomMargin = depth * 4
                        }
                    }
                addView(shadow)
            }
            /**
             * 카드뷰
             */
            val cardView = RoundSquare(mRadius, backgroundColor, context = context).apply {
                layoutParams = LayoutParams(MATCH_PARENT, MATCH_PARENT).apply {
                    marginStart = elevation.toInt()
                    marginEnd = elevation.toInt()
                    topMargin = (elevation * 0.5).toInt()
                    bottomMargin = (elevation * 1.5).toInt()
                    // top 보다 bottom이 조금 더 들려있게(elevation) 조정
                    // 조정하지 않을 경우, 그림자가 카드뷰 정중앙에서 퍼짐
                }
            }
            addView(cardView)
        }
    }
}
여러 뷰를 겹쳐 그려야하기 때문에 FrameLayout을 루트로 잡았다.
ConstraintLayout으로 생성해도 되지만 그럴 경우 아래를 기억해야 한다.
1. 코드로 생성하는 하위뷰마다 뷰 id를 만들어줘야 한다.
val shadow = RoundSquare(mRadius, shadowColor, mAlpha.toInt(), context).apply {
    layoutParams = LayoutParams(MATCH_PARENT, MATCH_PARENT).apply {
        marginStart = depth * 4
        marginEnd = depth * 4
        topMargin = depth * 4
        bottomMargin = depth * 4
    }
    id = View.generateViewId() // 뷰 id 생성
}
2. ConstraintSet()을 선언해서 상대적 위치를 잡아줘야 한다.
addView(shadow)

val set = ConstraintSet()
set.clone(this) // root 가 ConstraintLayout

set.connect(shadow.id, ConstraintSet.TOP, id, ConstraintSet.TOP)
set.connect(shadow.id, ConstraintSet.BOTTOM, id, ConstraintSet.BOTTOM)
set.connect(shadow.id, ConstraintSet.START, id, ConstraintSet.START)
set.connect(shadow.id, ConstraintSet.END, id, ConstraintSet.END)
// root의 id는 코드로 생성하지 않아도 ok, 사용처에서 선언 (ex: activity_main.xml)

set.applyTo(this)
RoundSquare.kt (모서리가 둥근 사각형 뷰)
class RoundSquare @JvmOverloads constructor(
    private val cornerRadius: Float,
    private val backgroundColor: Int,
    private val shadowAlpha: Int? = null,
    context: Context,
    attrs: AttributeSet? = null,
    defStyleAttr: Int = 0
): View(context, attrs, defStyleAttr) {

    private val paint: Paint = Paint().apply {
        isAntiAlias = true
    }

    override fun onDraw(canvas: Canvas?) {
        super.onDraw(canvas)

        canvas?.let {
            val radius = cornerRadius.coerceAtMost(rectWidth / 2).coerceAtMost(rectHeight / 2) * 1.3

            // 직사각형 뷰 그리기
            val width = width.toFloat()
            val height = height.toFloat()
            val rectWidth = width - paddingLeft - paddingRight
            val rectHeight = height - paddingTop - paddingBottom

            val centerX = paddingLeft + rectWidth / 2
            val centerY = paddingTop + rectHeight / 2

            // 배경색 필터로 입히기
            val colorFilter = PorterDuffColorFilter(backgroundColor, PorterDuff.Mode.SRC_IN)
            paint.colorFilter = colorFilter

            // 디폴트 투명도 100%
            paint.alpha = shadowAlpha ?: 256

            canvas.drawRoundRect(
                centerX - rectWidth / 2,
                centerY - rectHeight / 2,
                centerX + rectWidth / 2,
                centerY + rectHeight / 2,
                radius.toFloat(),
                radius.toFloat(),
                paint
            )
        }
    }
}
커스텀 카드뷰를 만든 뒤 activity_main.xml 에서 확인해본다.
activity_main.xml
<androidx.constraintlayout.widget.ConstraintLayout xmlns:android="http://schemas.android.com/apk/res/android"
xmlns:app="http://schemas.android.com/apk/res-auto"
xmlns:tools="http://schemas.android.com/tools"
android:layout_width="match_parent"
android:layout_height="match_parent"
android:padding="4dp">
<com.example.app.customView.CustomCardView
android:id="@+id/customCardView"
android:layout_width="120dp"
android:layout_height="120dp"
app:c_cardBackground="#ffffff"
app:c_elevation="10dp"
app:c_radius="10dp"
app:c_shadowColor="#ff0000"
app:layout_constraintBottom_toBottomOf="parent"
app:layout_constraintEnd_toStartOf="@id/cardView"
app:layout_constraintStart_toStartOf="parent"
app:layout_constraintTop_toTopOf="parent" />
<TextView
android:layout_width="wrap_content"
android:layout_height="wrap_content"
app:layout_constraintStart_toStartOf="@id/customCardView"
app:layout_constraintTop_toBottomOf="@id/customCardView"
app:layout_constraintEnd_toEndOf="@id/customCardView"
android:text="custom card view"/>
<androidx.cardview.widget.CardView
android:id="@+id/cardView"
android:layout_width="100dp"
android:layout_height="100dp"
android:outlineSpotShadowColor="#ff0000"
app:cardBackgroundColor="#ffffff"
app:cardCornerRadius="15dp"
app:cardElevation="10dp"
app:layout_constraintTop_toTopOf="parent"
app:layout_constraintBottom_toBottomOf="parent"
app:layout_constraintEnd_toEndOf="parent"
app:layout_constraintStart_toEndOf="@id/customCardView"/>
<TextView
android:layout_width="wrap_content"
android:layout_height="wrap_content"
app:layout_constraintStart_toStartOf="@id/cardView"
app:layout_constraintTop_toBottomOf="@id/cardView"
app:layout_constraintEnd_toEndOf="@id/cardView"
android:text="card view"/>
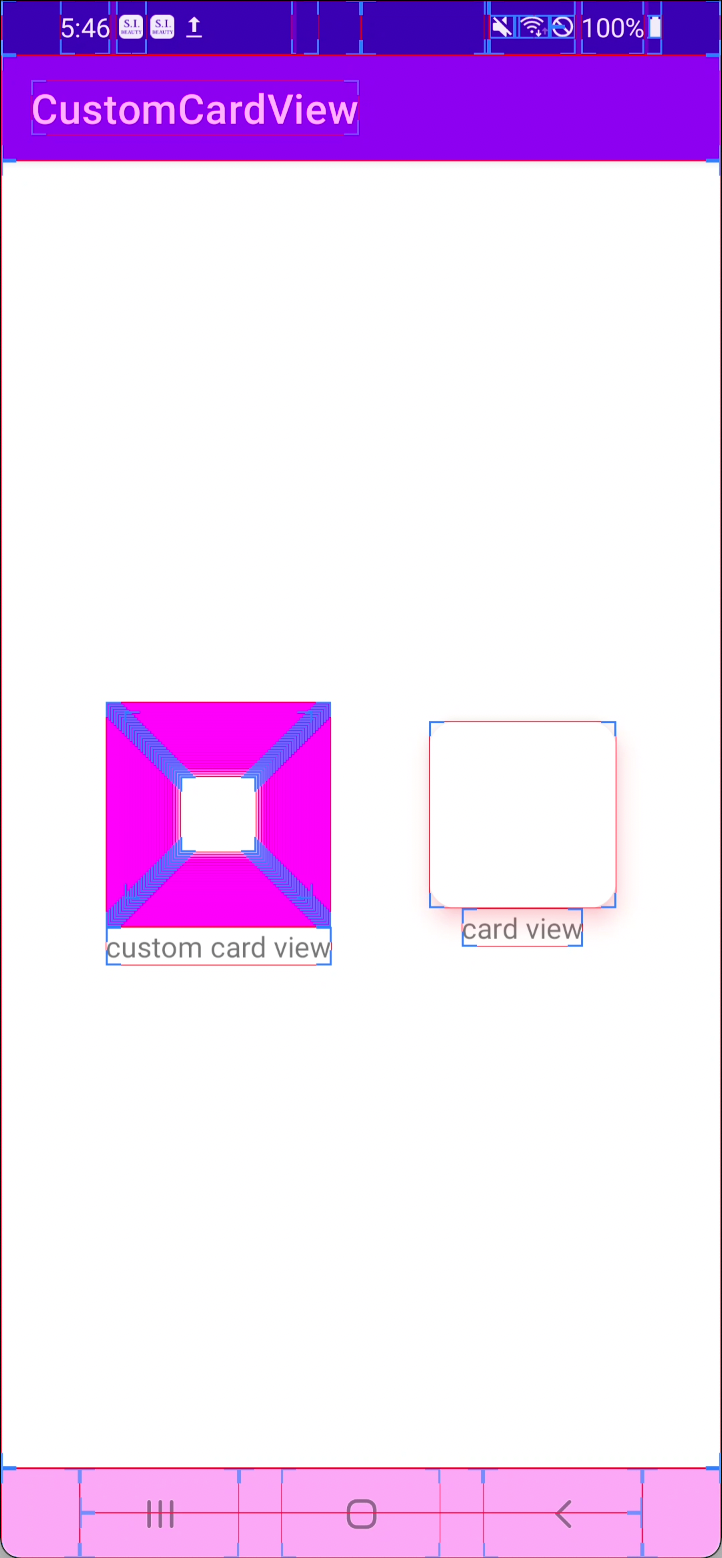
</androidx.constraintlayout.widget.ConstraintLayout>프리뷰

왼쪽이 커스텀 카드뷰, 오른쪽이 기존의 카드뷰이다.
기존 카드뷰 속성을 조절해가면서 커스텀 카드뷰의 계산도 맞췄다.
문제점
뷰를 겹겹이 붙였기 때문에 레이아웃 범위 표시를 했을 때 레이어가 빽빽하게 보인다.
이것을 해결하는 방법은 다음 글 2편에서 적도록 하겠다.
참고
https://cishome.tistory.com/171
[안드로이드] Missing required view with ID: ~~
Missing required view with ID: ~~ viewBinding 연습 해볼겸 기존에 만든 프로젝트의 내용을 변경하고있는데 위와 같은 에러를 만났습니다. main 은 appbar 와 content 구역으로 나뉘어있는데 content 구역을 include
cishome.tistory.com
'TIL - 안드로이드' 카테고리의 다른 글
| [안드로이드] 커스텀 뷰 Custom View 만드는 법 (0) | 2023.08.11 |
|---|---|
| [안드로이드] ExoPlayer 비디오 캐싱하기 (0) | 2023.08.09 |
| [안드로이드] ListAdapter DiffUtil 제대로 쓰기 - 3 (0) | 2023.07.28 |
| [안드로이드] 중복체크 되는 리스트 Preference 저장하고 테스트하기 (0) | 2023.07.20 |
| [안드로이드] ListAdapter DiffUtil 제대로 쓰기 - 2 (0) | 2023.07.13 |

