
Notice
Recent Posts
Recent Comments
Link
| 일 | 월 | 화 | 수 | 목 | 금 | 토 |
|---|---|---|---|---|---|---|
| 1 | ||||||
| 2 | 3 | 4 | 5 | 6 | 7 | 8 |
| 9 | 10 | 11 | 12 | 13 | 14 | 15 |
| 16 | 17 | 18 | 19 | 20 | 21 | 22 |
| 23 | 24 | 25 | 26 | 27 | 28 |
Tags
- llm
- kotlin collection
- android
- AWS EC2
- android ktor
- list map
- doc2vec
- DiffUtil.ItemCallback
- FastAPI
- 독서
- ktor api call
- getChangePayload
- ListAdapter
- ChatGPT
- android exoplayer
- 스피너
- android custom view
- 유튜브
- video caching
- ktor client
- kotlin list
- 안드로이드
- ExoPlayer
- map
- Zsh
- build with ai
- ListAdapter DiffUtil
- Python
- exoplayer cache
- 시행착오
Archives
- Today
- Total
버튼 수집상
[안드로이드] RecyclerView에 radius 적용하기 본문
RecyclerView 리사이클러뷰에 radius를 적용하는 방법

방법 1. 벡터로 마스킹하기
하얀 바탕에 오리고 싶은 영역을 투명처리한 벡터 이미지를 덧대어서 마스킹을 해봤다.
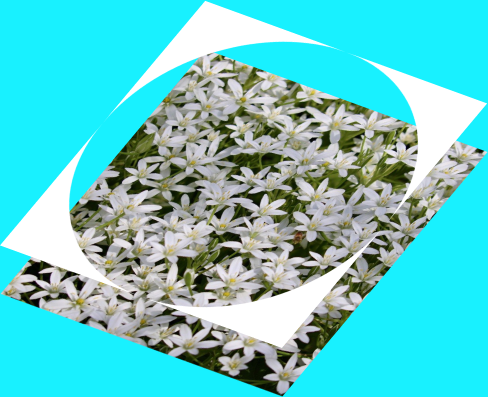
투명영역이 있는 마스킹 이미지는 벡터로 구현해서 용량을 조금이라도 줄이려고 했다.
대신 앱 바탕색이 하얀색이 아니면 하얗게 드러난다.
<TextView
    android:id="@+id/tv1"
    android:layout_width="wrap_content"
    android:layout_height="wrap_content"
    android:text="벡터 배경"
    app:layout_constraintStart_toStartOf="parent"
    app:layout_constraintTop_toTopOf="parent" />

<androidx.recyclerview.widget.RecyclerView
    android:id="@+id/list1"
    android:layout_width="match_parent"
    android:layout_height="wrap_content"
    android:layout_marginTop="30dp"
    android:orientation="horizontal"
    app:layoutManager="androidx.recyclerview.widget.LinearLayoutManager"
    app:layout_constraintTop_toTopOf="parent"
    tools:listitem="@layout/item_rect" />

<!-- 직사각형으로 가로/세로 늘리면 radius도 같이 늘어남, 양 모서리마다 따로 -->
<!--    <include-->
<!--        layout="@layout/masked_rect"-->
<!--        android:layout_width="0dp"-->
<!--        android:layout_height="0dp"-->
<!--        app:layout_constraintStart_toStartOf="@id/list1"-->
<!--        app:layout_constraintEnd_toEndOf="@id/list1"-->
<!--        app:layout_constraintTop_toTopOf="@id/list1"-->
<!--        app:layout_constraintBottom_toBottomOf="@id/list1"/>-->

<View
    android:layout_width="0dp"
    android:layout_height="0dp"
    android:background="@drawable/round_mask_start"
    app:layout_constraintBottom_toBottomOf="@id/list1"
    app:layout_constraintDimensionRatio="1:1"
    app:layout_constraintStart_toStartOf="@id/list1"
    app:layout_constraintTop_toTopOf="@id/list1" />

<View
    android:layout_width="0dp"
    android:layout_height="0dp"
    android:background="@drawable/round_mask_end"
    app:layout_constraintBottom_toBottomOf="@id/list1"
    app:layout_constraintDimensionRatio="1:1"
    app:layout_constraintEnd_toEndOf="@id/list1"
    app:layout_constraintTop_toTopOf="@id/list1" />
뷰포트가 정사각형인 벡터 파일을 직사각형 뷰에 적용시키면
균일하게 꺾이던 모서리 radius의 경사면이 같이 늘어났다.
벡터를 요리조리 만들어봐도 알 수가 없어서 1:1 비율을 유지하는 정사각형 벡터를 양 옆에 적용시켰다.
이 경우엔 아마 커스텀뷰를 만들면 될 것 같다.
round_mask_start.xml
<?xml version="1.0" encoding="utf-8"?>
<vector xmlns:android="http://schemas.android.com/apk/res/android"
    android:width="24dp"
    android:height="24dp"
    android:viewportWidth="24"
    android:viewportHeight="24">
    <path
        android:fillColor="#FFFFFF"
        android:fillType="evenOdd"
        android:pathData="M0,0h24v24h-24z M24,0v24h-22a2,2 0,0 1,-2 -2v-20a2,2 0,0 1,2 -2h24z"/>
</vector>
round_mask_end.xml
<?xml version="1.0" encoding="utf-8"?>
<vector xmlns:android="http://schemas.android.com/apk/res/android"
    android:width="24dp"
    android:height="24dp"
    android:viewportWidth="24"
    android:viewportHeight="24">
    <path
        android:fillColor="#FFFFFF"
        android:fillType="evenOdd"
        android:pathData="M0,0h24v24h-24z M24,2v20a2,2 0,0 1,-2 2h-24v-24h24a2,2 0,0 1,2 2z"/>
</vector>
간단한 벡터 패스 설명:
M0,0 스타트 좌표
h 수평 이동
v 수직 이동
a2,2 0,0 1,2 유닛2 만큼의 반지름을 가지는 원호, 즉 radius 2
z 패스 닫기
round_mask_start는 좌측 상단, 좌측 하단 모서리에 radius 2가 적용된 정사각형,
round_mask_end는 우측 상단, 우측 하단 모서리에 radius 2가 적용된 정사각형이다.
방법 2. 카드뷰로 감싸기
가장 익숙하고 간단한 방법이다.
<TextView
    android:id="@+id/tv2"
    android:layout_width="wrap_content"
    android:layout_height="wrap_content"
    android:text="카드뷰 배경"
    app:layout_constraintStart_toStartOf="parent"
    app:layout_constraintTop_toBottomOf="@id/list1" />

<androidx.cardview.widget.CardView
    android:id="@+id/cardview"
    android:layout_width="match_parent"
    android:layout_height="wrap_content"
    android:layout_marginTop="30dp"
    app:cardCornerRadius="10dp"
    app:cardElevation="0dp"
    app:layout_constraintTop_toBottomOf="@id/list1">

    <androidx.recyclerview.widget.RecyclerView
        android:id="@+id/list2"
        android:layout_width="match_parent"
        android:layout_height="wrap_content"
        android:orientation="horizontal"
        app:layoutManager="androidx.recyclerview.widget.LinearLayoutManager"

        tools:listitem="@layout/item_round" />
</androidx.cardview.widget.CardView>
방법 3. 뷰홀더에 radius 적용하기
위 두 UI와 다르게 생겼다.
리사이클러뷰 안 쪽 뷰홀더에 radius를 적용한 것으로
뷰홀더가 리사이클러뷰를 꽉 채우면 바깥쪽 모서리가 각지게 보인다.
728x90
'TIL - 안드로이드' 카테고리의 다른 글
| [안드로이드] ListAdapter DiffUtil 제대로 쓰기 - 1 (0) | 2023.07.13 |
|---|---|
| [안드로이드] 시인성 향상 애니메이션 제거 여부 알기 (0) | 2023.07.03 |
| [안드로이드] ViewPager 내부 웹뷰 가로 스크롤 처리하기 (0) | 2023.06.21 |
| [안드로이드] notify 호출 후 ViewPropertyAnimator 에서 알파값이 변하지 않는 이슈 (0) | 2023.06.15 |
| [안드로이드] TabLayout.Tab 레이아웃에 커스텀뷰 세팅 + 뷰 추가하기 (0) | 2023.06.12 |
'TIL - 안드로이드' Related Articles
more

